Friday, February 15, 2013

Banana Muffins (Dairy Free)

 
This banana recipe is an all time favorite at my house! If your family is like mine they will eat them as fast as they come out of the oven. I found this muffin recipe at greenmamaspad.com.  I did modify it slightly, leaving out the nutmeg and using whole wheat white flour instead of all purpose flour. 

 Ingredients
1 ½ cups whole wheat white flour
1 teaspoon baking soda
1 teaspoon baking powder
1/2 teaspoon salt
3/4 teaspoon cinnamon
3 very ripe bananas, mashed
1 egg, lightly beaten
3/4 cup white sugar
1/3 cup packed brown sugar
1 teaspoon vanilla
1/3 cup oil

Directions: 

1. Preheat oven to 375 degrees. Use muffin liners or lightly grease the muffin pan. 


     (Ahh! Please ignore how horrible my non-stick pan looks.... I only use it with liners since it has lost it non-stickiness!)


2. In a large bowl, mix together dry ingredients (flour, baking soda, baking powder, salt, cinnamon).


 Mash the bananas and beat together with the egg. sugar, vanilla and oil in a second bowl.


 3. Stir the banana mixture into the flour mixture.


  Be careful not to over mix. Spoon into muffin cups, filling about 2/3 full.


Yep definitely time to replace the pan...blah! I was cringing as I edited the photos!


4. Bake in preheated oven. For mini muffins bake about 12-15 minutes. For full size muffins, bake about 18-20 minutes. Insert toothpick into center of muffin to test. 

Enjoy some dairy free goodness!

 
It feels great to find new recipes that I can feed my no dairy girl! Let me know if you have a non-dairy family favorite! 


Thursday, February 14, 2013

Foot Print Valentines!


This was a fun craft project to do with the kids. The big boys loved getting their feet painted to make the heart prints. Brooklyn on the other hand took a bit of convincing! Once I finally talked her into letting me she was all giggly and excited! She said it "tickled" and was "cold". haha! 


 I found this project on Pinterest and put my own twist on it. 


I started with white paper, red paint, and a sponge brush.


And found some little feet....!


He was excited... can you tell? 


Paint on some red paint. Warning may bring out squeals and giggles!


Make two adorable prints. I made sure I had some wet paper towels handy to clean up with. Eli kept saying it looked like I was painting blood on his feet. He even asked me if we could pretend it was real blood! LOL Hmm...I am not sure if that is the boy in him or if I should be horrified!


Here was Brooklyn while we were painting Eli's feet! She said "wook mama! TWO!". Such a stinker!


After the foot prints dried I cut them out in a heart shape and glued them to another piece of paper. The big boys glued and placed the hearts and poem by themselves.  Finishing the heart I used a glitter pen to trace the heart. I typed up the poem in Word. Here is the PDF we used!


Eli's Valentine!


Brooklyn's Valentine!


Hope you all had a special day with your kiddos!


Wednesday, February 13, 2013

Bible Verse ABC Cards


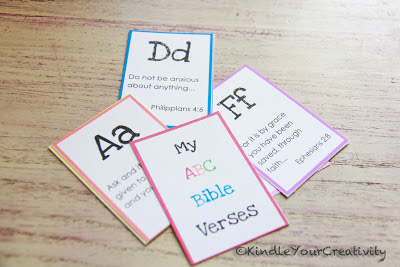
I saw this FREE printable on Pinterest by Homeschool Creations.  This colorful printable is playing card sized with a verse for each letter of the alphabet. What a fun way to help your preschooler learn the ABC's while learning scriptures at the same time!


We find that teaching our children God's word is the best approach to instructing good behavior.  We want them to know how God wants them to treat others and how we need to obey his teachings.

This printable is a great resource!

Here is what I gathered up to put our ABC cards together....
  -The free printable from Homeschool Creations
  -Clear Contact Paper (I purchased this at Hobby Lobby with a 40% coupon! Yay!)
  -hole punch
  -scissors or cutting board
  -A jump ring.... I used twine because that is what I had on hand. ;)


 At first I wasn't thinking (....or maybe distracted by several kids asking me what I was doing!) and I started cutting the cards out before I laminated them. 


 Thankfully I had only cut out the first page... So Simply cut out your clear contact paper to the size you need and sandwich the ABC cards. 


 This printable includes blank cards so you can add verses or customize them to create your own.  I went ahead and laminated them blank. I thought I could use a dry erase marker and change up what verse, etc I put on them.


 All cut out...now punch the holes and add your jump ring, twine, ribbon or whatever you have! 


Ta Da! 


 What great Scriptures to be on the hearts of our little ones!


Do you use free printable to help your child learn? Let me know of your favorite resources!


Tuesday, February 12, 2013

Diving In

   Welcome to Kindle Your Creativity! 


   My name is Briana, I love everything crafty and DIY! I am a frugal crafter and try to do my projects with a lot of what I already have. Scoring great deals at garage sales and thrift stores makes my day! 


   I am 25 and have been married to my Mr. Right for 5 1/2 years.  We live in central Arkansas with our two amazing kiddos, Eli (4) and Brooklyn (2).   I am blessed to be able to stay home with my children to be there for their "first's" and teach them along the way. During the weekdays I do childcare from my home to help supplement our income. With the extra little ones around we try to stay busy with different crafts and activities. 

    My Husband just finished his bachelors and we are in the process of waiting for God to open the next door. As we wait we are trying to finish updating and remodeling our first little starter home. So far we have done ALL the work ourselves. It has been a great learning experience both DIY and in our marriage! haha  We have lived in our little 1,000 sq ft house for about 3 1/2 years and we are more then ready to upgrade to a bigger house.  With that said you can expect to hear about our fun times as we finish getting our house ready to sell.

   My goal is to blog about my projects and encourage others to find their creative side. I want to share how I find frugal ways to get creative.

   Crafting has been a passion of mine since I was a little kid. I can remember spending hours creating master pieces out of popsicle sticks and glue. Today my creative side has evolved and I hope is more attractive then glue and sticks!  I will be posting about my mommy adventures, projects, kid crafts, great finds, yummy recipes, and much more!

I would LOVE to hear from you! Comment or email me if something inspires you or if you have tried something similar.  I love new ideas and frugal tips. 

 I want to keep this blog an encouraging and fun environment that is non threatening. We are just talking about crafts and recipes right?  You can find my comment policy here. 


Thanks for stopping by. Hope you see something you like!


Valentine Window Cling Hearts

We love making window clings for all occasions. For Valentine's Day we made these colorful hearts with water colors and coffee filters!


My kids could paint all day if I let them, so anything that involves painting is usually a hit. 
(Brooklyn thought the table covering needed some color too!) 


I just love fun photos like this one!


I set them up with the water color paints and coffee filters and let them go to town!  


As they finished I fist started to place them directly on the cookie sheets to dry. The filters were so saturated I was afraid they may take forever to dry. I decided to place the filters on cooling racks to help with the air flow.


Once the colorful discs were dry I traced a heart shape on them.


I like to use a heart cut out to trace the hearts. I am a bit of a perfectionist... (I know its a kids craft!) Anyway, I made some heart shapes in Word for another activity so I just used one of the hearts to trace on the shape. 
 You can download my heart PDF here.


Next Place the heart cut outs on clear contact paper. (Only one side will have the contact paper.) Cut around the hearts leaving a bit of an edge for they can stick to the window.


Have your kids help you decorate the window with the hearts.  Then sit back and enjoy the sunshine shinning through the colorful hearts! 


I love how the contact paper is easy to wipe over. Since I have so many little hands touching the windows I like to sanitize the surface often. 


Now I feel like leaving the blinds up  so we can admire our beautiful Valentine hearts!


What Valentine's Day projects have you been doing? 


Heart Googly Eyes


Are these little hearts not adorable or what!?! They turned out better then I thought they would. I was imagining the kids putting the nose where the eyes should go and the eyes as ears! haha! I guess I should give my kids more credit because their hearts turned out awesome!  My kids love making art projects with googly eyes! I got these little guys started and let the big boys and Brooklyn put them together.


All you need to make some cute Valentine's Day hearts are...

-Pink, red, and white construction paper
-Googly eyes
-glue dots or glue sticks
-scissors
-marker


I made a this heart in Word and used a print out to trace my hearts on construction paper.


 I cut out the hearts and the leg/arm strips before I called them to the table. I tried to show the boys how to fold the paper back and forth to make the arms and legs. They gave it a good try and quickly started asking me to help them. So I hurriedly folded ALL the arms and legs with three excited kiddos asking me questions the whole time!


(the mouth heart is missing from this picture)


 I chose to use glue dots like these ones to stick everything together. You can use glue sticks as well. With the glue dots I just put one on the back of each eye, mouth, and nose piece and let them choose where to put it. For the arms and legs I had to show them where the glue dot was and they were good to go! I used a marker to draw a line across the mouth/heart to look more like lips. 


And Wa La! An adorable little heart! My kids walked them around making them talk and their eyes wiggle!


Simple, cute, fun, and festive!


What projects have you been doing with your little ones for Valentine's Day? 


Wacky Cake (Dairy Free) & Brooklyn Turns 2!

My sweet little girl turned two years old a couple weeks ago. I am in disbelief that she could possibly be two!! You hear people say "time flies"..... I don't think anyone fully understands how fast it does fly until you have a child! Sigh... So my baby is a big girl now. Makes me want to go cry for a bit, yet at the same time I am excited to watch her grow and learn!


Unfortunately, on the day of her party she was not feeling well and we had to cancel. It was quite the let down.... Although, I think I was the one most upset! ha All the planning, buying, and preparing. We still had our families come over so we did celebrate after all.


I had fun making the banner and pom poms with the help of my sister, Brooklyn's Aunt Reyna!


 I didn't end up setting everything out since the whole party wasn't attending. Here is what we did have out.


Brooklyn was a "little" clingy since she wasn't feeling well. She did get excited about blowing the candles out though! 


 Eli wanted to get in a picture too! He was so precious to Brooklyn on her Birthday.


Do you see the exposed drywall behind me in the above photos? That has been a work in progress for a LONG time. You will see more on that project soon. :)


~~~~~~~~~~~~~~~~~~


Brooklyn is allergic to milk which includes ALL dairy products and anything with milk in it. It has been quite the challenge finding good substitute recipes. Right after Christmas we went on a short trip to visit my mom in Tennessee. Literally, we decided Friday night at 9pm we would leave around noon the next day! lol It was a fast trip, but we had fun surprising them! While we were there my mom made a Wacky Cake! She found the recipe in a old church cook book. This recipe reminded her of a cake her mom (my grandma) used to make when she was younger. The exception was this Wacky Cake is DAIRY FREE!! Yay! And it is tasty as well! Double Yay!


 (*Note, the ice-cream was not dairy free!)

 So for the party I made my own Wacky Cake and added a sweet coconut frosting. I found the frosting recipe over at ohsheglows.com. I did it a little differently....ah hem (clearing of throat)... I didn't put the coconut milk in the fridge overnight! It wasn't as solid as it probably should of been, but I think it looked and tasted great!


So here is the Wacky Cake Recipe! 
Ingredients:
-3 c. flour                        - 2 Tbsp. Vinegar
-2 c. sugar                       - 3/4 c. vegetable oil
-1 tsp. baking soda          -2 c. water
-3 Tbsp cocoa powder 

Sift together flour, sugar, and cocoa powder. Add vinegar, oil, and water. Mix well. Bake at 350 degrees for 30-40 minutes.

Coconut Frosting- (I highly suggest going over to the excellent step-by-step process at ohsheglows.com found here.)
Ingredients:
 -Full fat coconut milk (placed in refrigerator overnight)
 -2-3 tsp maple syrup (or whatever sweetener of your choice)
-1/4-1/2 tsp. pure vanilla extract


She LOVED her Birthday Cake


Eli went all in and forgot about his fork! lol oh boy!


 Happy Birthday Big Girl!
(You can see how she wasn't feeling well.)


Let me know if you try the Wacky Cake or have another great dairy free cake recipe!


Related Posts Plugin for WordPress, Blogger...